

In this post, we will learn how to create and manage Shipping, Shipping Rate for selected products and shipping locations. Go to Shipping > Shipping & Delivery.
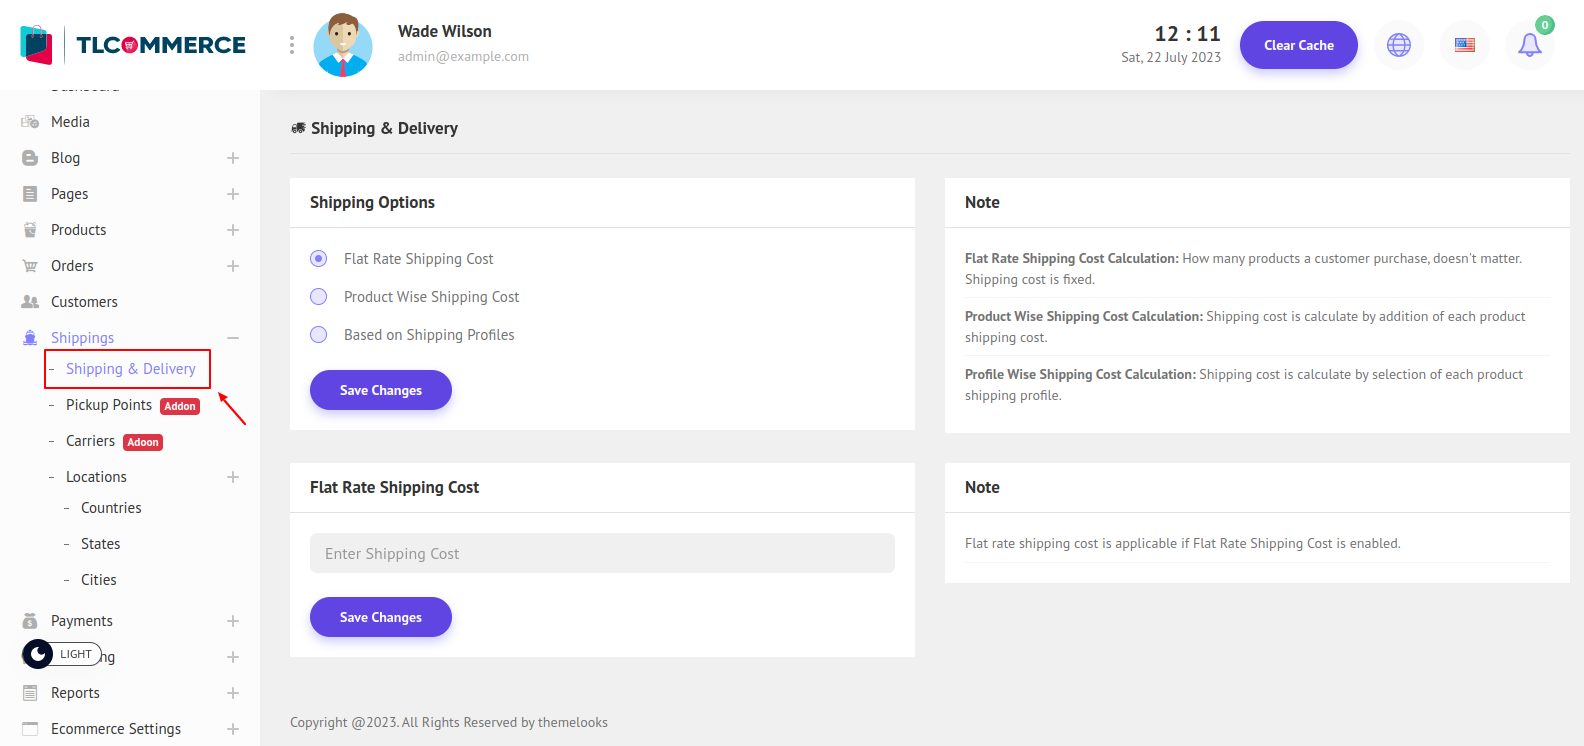
For shipping, there are three shipping options.
1. Flate Rate Shipping - How many products a customer purchases, doesn't matter. Shipping cost is fixed.
2. Product Wise - Shipping cost is calculated by each product shipping cost. You can set product shipping costs when creating or editing a product if the product-wise shipping cost is enabled.
3. Shipping Profile - Shipping cost will be calculated by each product Shipping profile. Below is a details explanation of how a shipping profile actually worked.
Shipping rate and shipping location are very important parts of our e-commerce. TL Commerce will give you the features to maintain shipping rates and shipping locations for selected products like Shopify.
From the Shipping > Shipping & Delivery modules, you can create, and manage, a shipping profile.
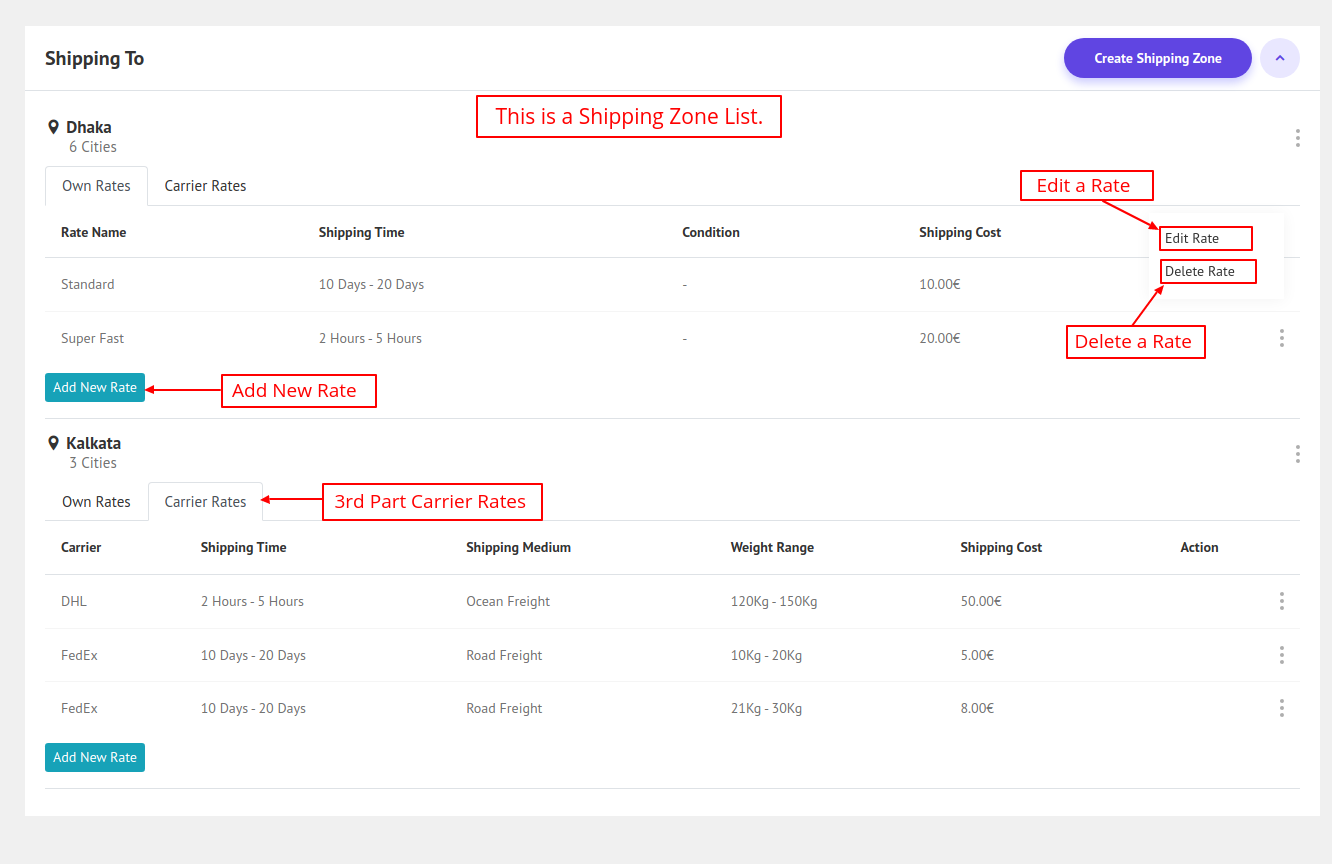
You can also create different shipping zone for each shipping profile based on different shipping locations around the world.
After creating the shipping zone for the selected shipping location you can create different shipping rates.
TL Commerce will give you the functionality to create custom and 3rd party carriers' shipping rates and also allows you to create conditional shipping rates, like weight-based shipping rates.
You can also set the delivery time for each shipping rate.
When a customer tries to buy a product from his/her location she or he can choose the shipping rate and delivery method from the shipping rates which are match his/her location and selected product.
Go to the Shipping > Shipping & Delivery module. Save shipping option Based on Shipping Profiles. Shipping profiles and shipping time will be available
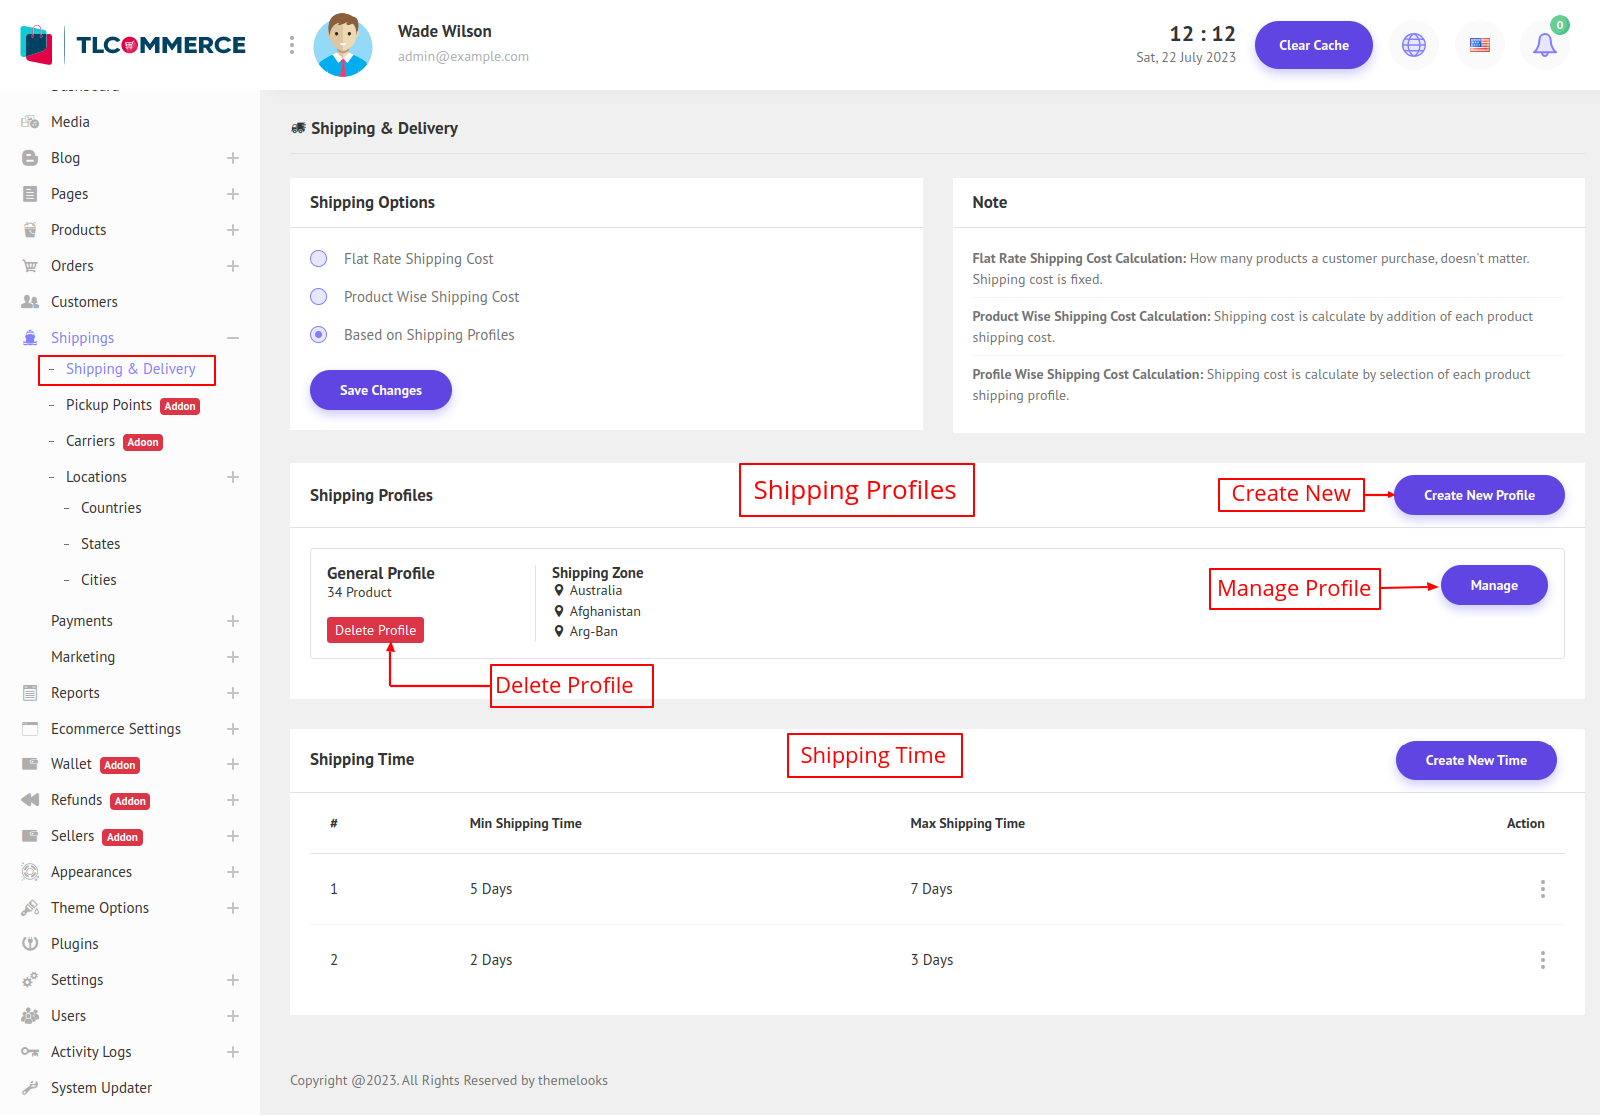
To Create New Shipping Profile click on Create New Profile from the top. It will redirect you to create a shipping page.

Shipping Profile Create Form
1. Profile Name: Enter a profile name. This profile name is not visible to the customer
2. Products: Select the products from the drop-down where this shipping profile will be applicable.
3. Shipping From: Enter a location from where products are shipping to customers. Customers can see this location.
4. Address: Enter an address from where products are shipping to the customer.
Create Shipping time
To Create New Shipping Time click on Create New Time. It will open a model. Here you can set minimum and maximum time and click Save.

You can also delete shipping time click Delete from the shipping time list actions.
You can manage your Shipping Profile by clicking the Manage button. It will redirect you shipping profile management page.
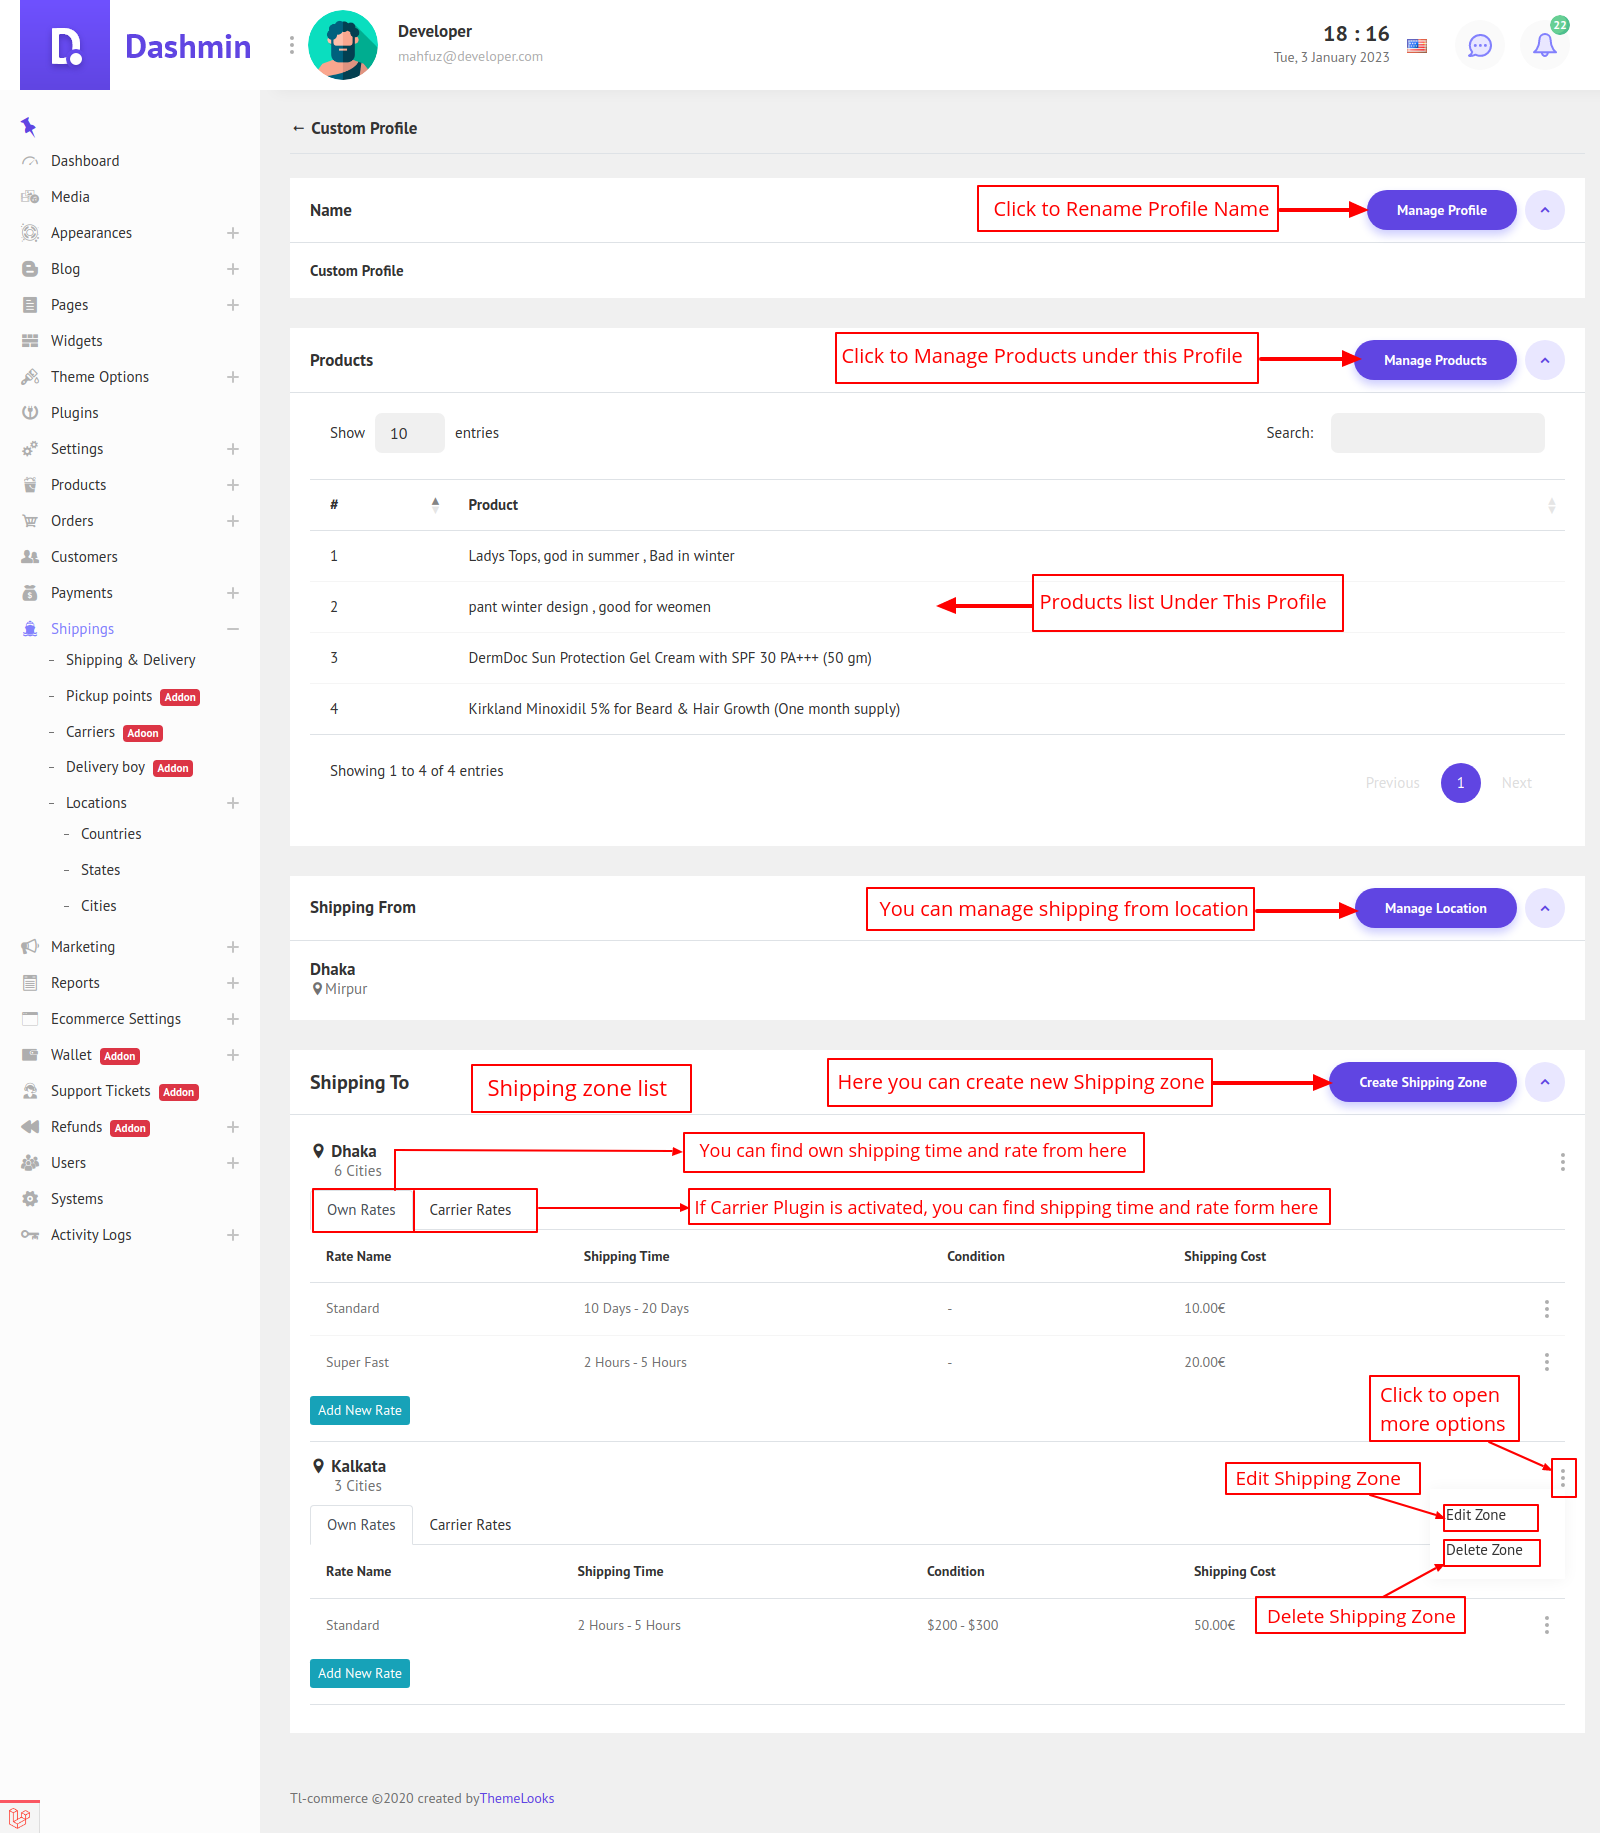
Here you can Edit the Shipping Profile Name, Manage Shipping Profile's Products and Shipping Location. From here you can also create shipping zone and shipping rates.
Create Shipping Zone
To create a new shipping zone you need to click Create Shipping Zone button. A Create New Shipping Zone popup is open after clicking Create Shipping Zone button.
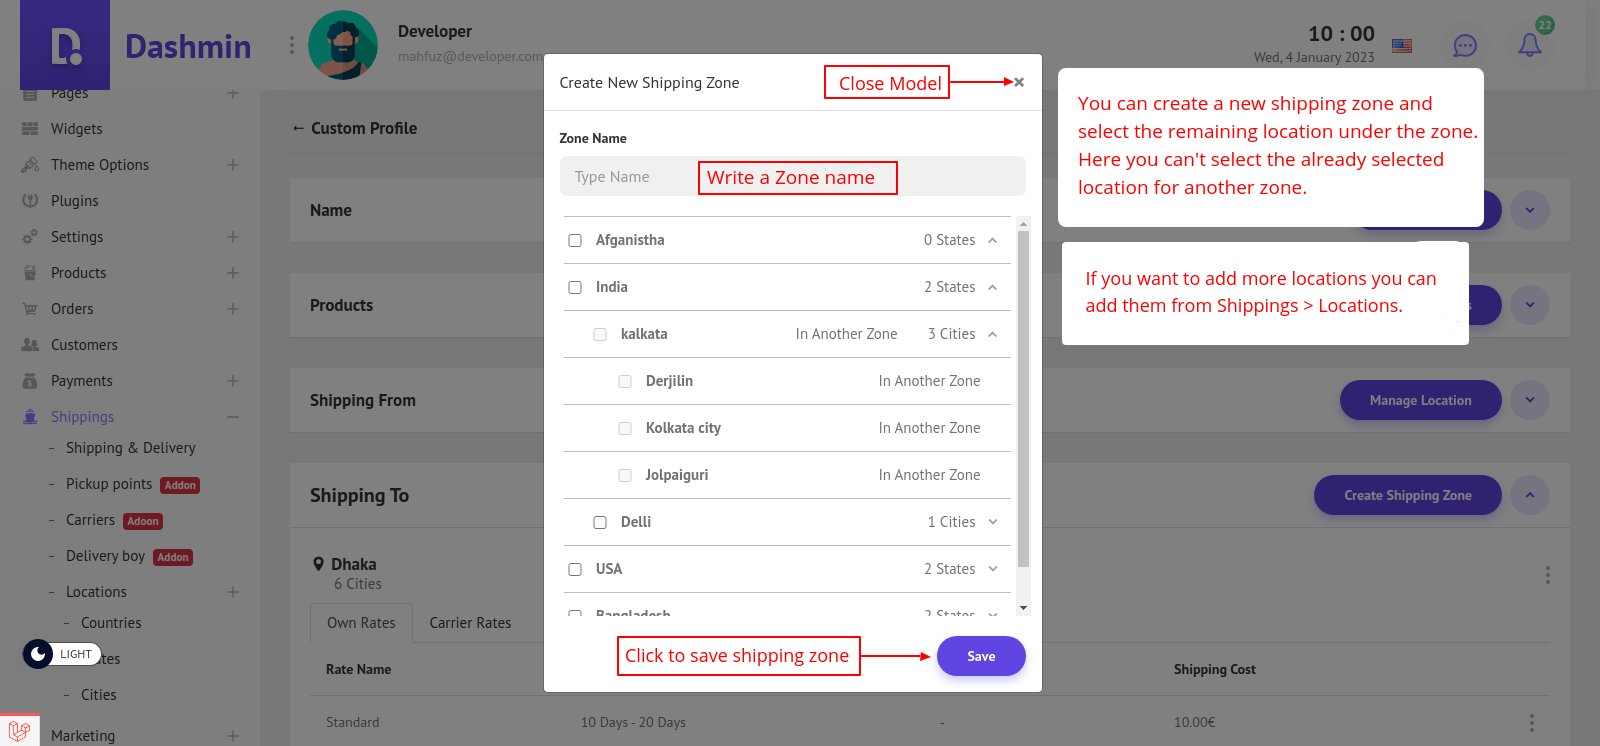
Shipping Zone Form
1. Zone Name: Enter a zone name. This is not visible to customers.
2. Select Location: From the checkbox, you can check the location to add this location to this shipping zone
Click Save Button to create a new shipping zone.
You can edit the Shipping Zone by clicking Edit Zone and also delete it by clicking Delete Zone.
Create Shipping Rate
From the shipping zone list, you can create multiple shipping rates for each shipping zone. There are two types of shipping rates. One is its own rate and another is 3rd party carriers' rate. To create 3rd party carrier shipping rate you will need to activate 3rd party Carriers Plugin. When customers purchase products they will get these shipping rate options and they can choose one for each item in the cart to complete creating an order. From the shipping zone table, you will get an Add New Rate button to create a new shipping rate for each shipping zone.
To Create a New Rate Click Add New Rate. After clicking Add New Rate button Add New Rate popup is open.
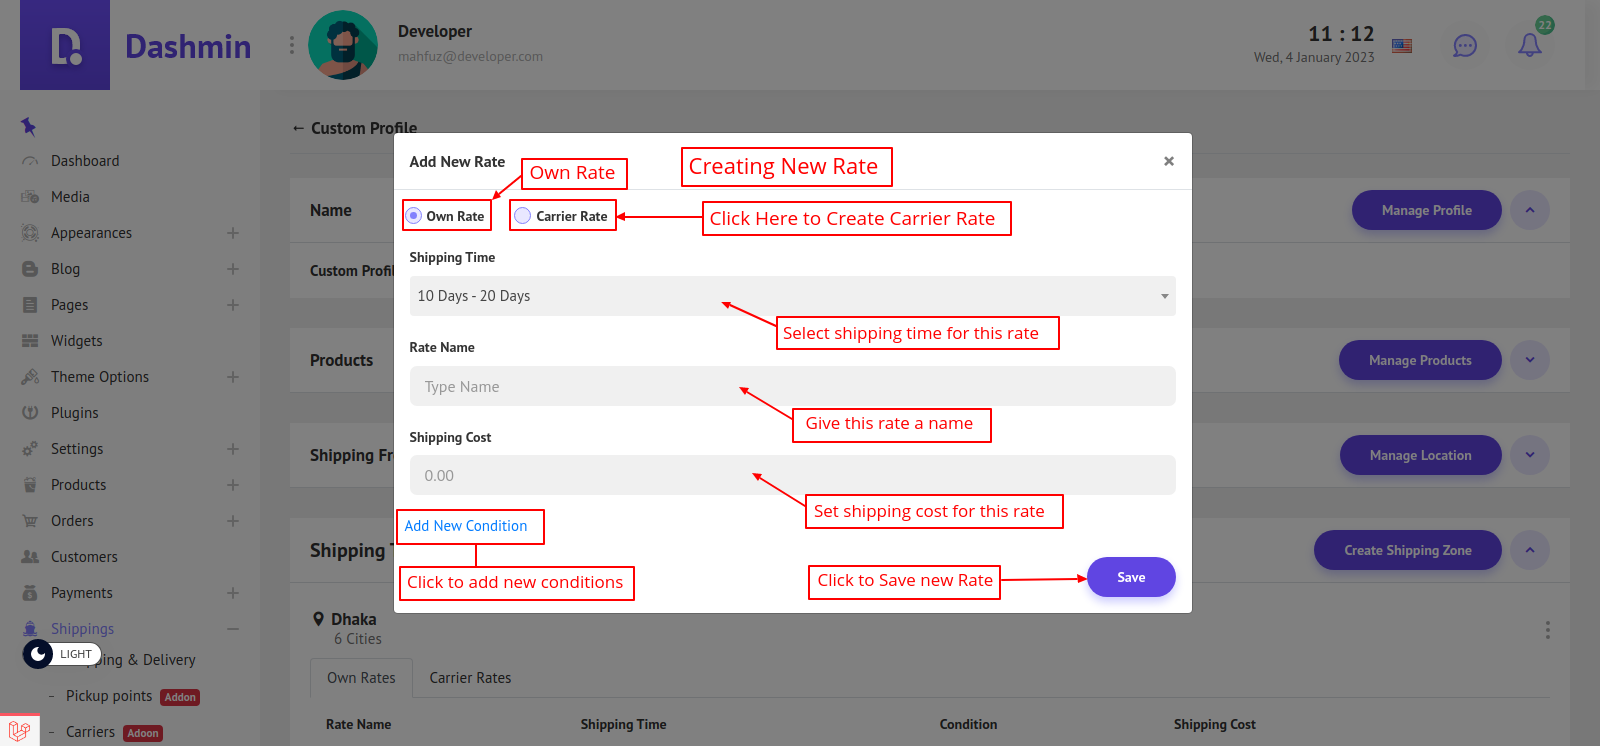
To create your own rate select your own rate radio on top. And If you want you can add a condition by clicking Add New Condition.
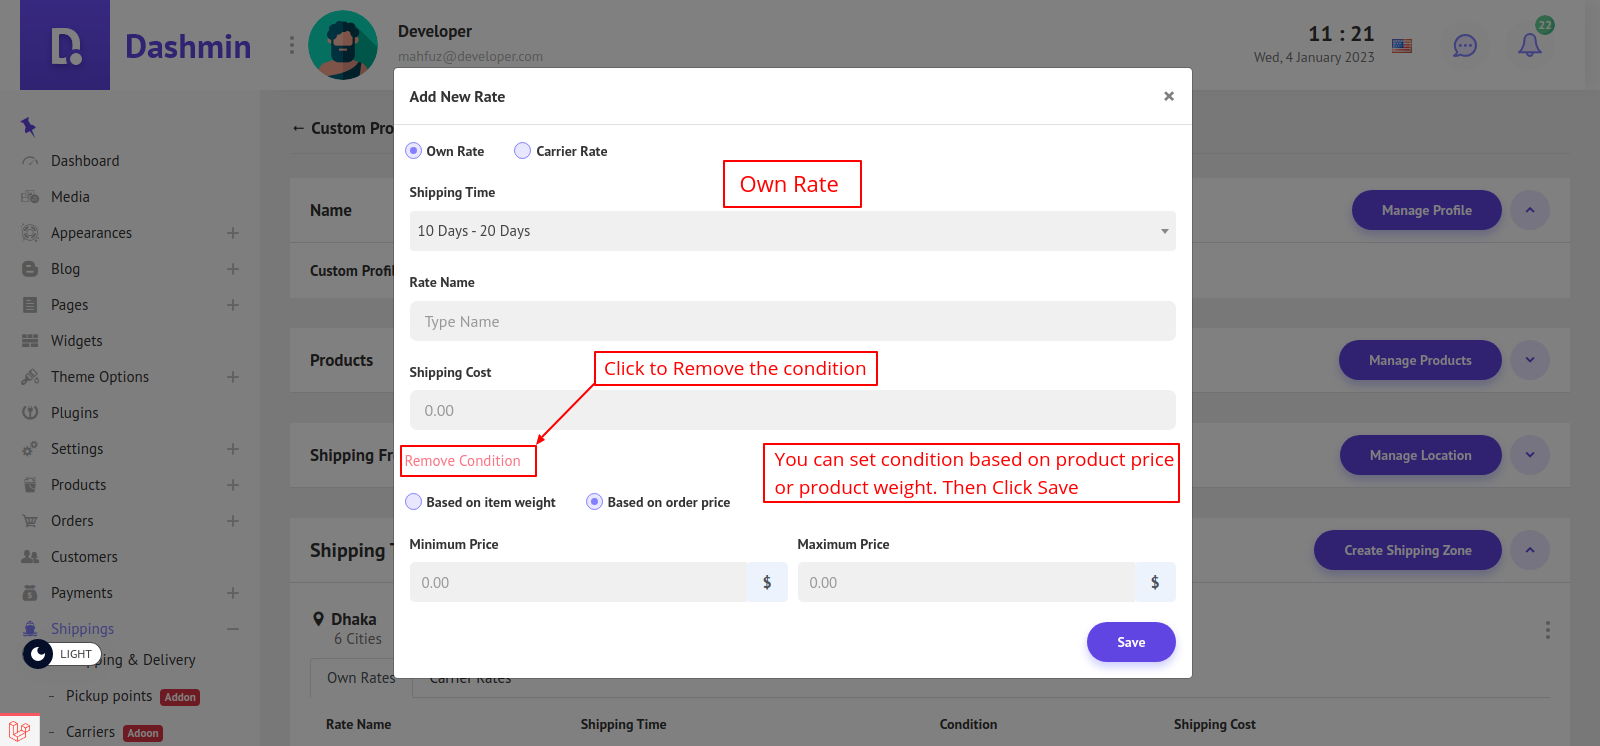
Now you can set conditions based on price or weight and Click Save.
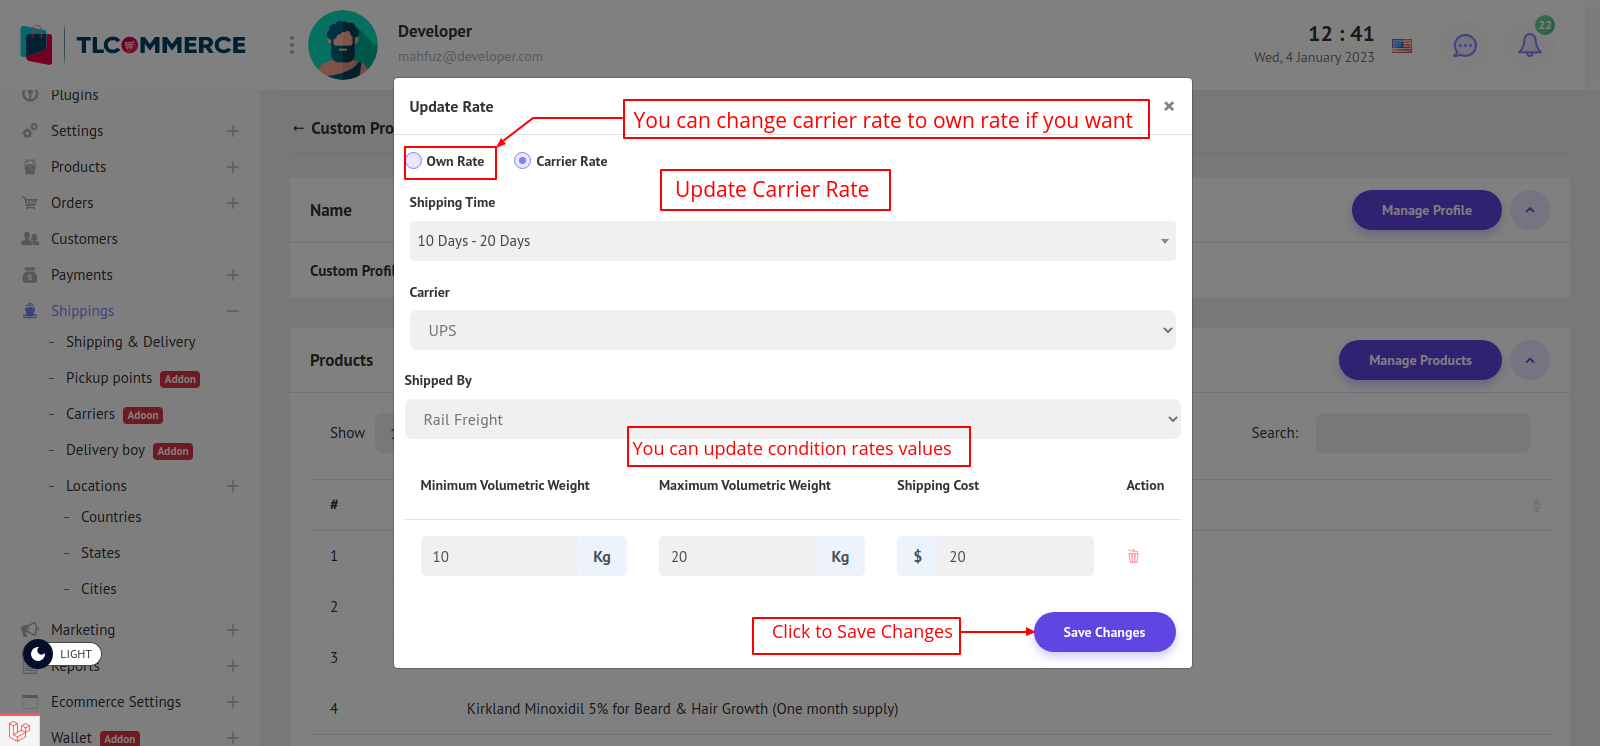
To create a carrier rate select Carrier Rate radio.

You can also add weight range and set price by clicking Add new Range as many you like and can also remove the range.

You can also edit the rate by clicking Edit Rate and also can delete rate by clicking Delete Rate. If you edit a rate you can also change a carrier rate to own rate and vice versa.

Now finally after creating a shipping zone, creating shipping rates, and adding product your shipping profile is ready.